Thursday, November 20, 2014
Thursday, November 6, 2014
Wednesday, November 5, 2014
Why I haven't tried this when I studied 555 timer
It always a good idea to connect output to a speaker to get the feeling that what actually the device do in reality.
Usually we connect the output to CRO in our college labs, But I feel its always a good idea to take the output to a speaker in your own experiments labs.
The Sine waves you see in the CRO gives you experimental results,but if you need to feel electronics it always good to connect the outputs to some display or speaker kind of devices.
Hadoop Tutorial 1 - What is Hadoop?
One of the advantage of Social networking website is they helps to promote new technologies even though its their need.
Apache Hadoop is an open-source software framework for distributed storage and distributed processing of Big Data on clusters of commodity hardware. Its Hadoop Distributed File System (HDFS) splits files into large blocks (default 64MB or 128MB) and distributes the blocks amongst the nodes in the cluster. For processing the data, the Hadoop Map/Reduce ships code (specifically Jar files) to the nodes that have the required data, and the nodes then process the data in parallel.

Raspberry Pi - How to check Free space in Raspberry Pi
I was actually looking how to check free space in Raspberry. The linux df command helps to check the disk file system.
You can try df -BM to get the disk space .

Raspberry Pi Using ‘-h‘ parameter with (df -h) will shows the file system disk space statistics in “human readable” format, means it gives the details in bytes, mega bytes and gigabyte. For more details on Df command visit http://www.tecmint.com/how-to-check-disk-space-in-linux/
Monday, November 3, 2014
Installing MongoDB (noSQL database) in Raspberry Pi
I am trying to install MongoDB in raspberry, Following steps are used to install in Raspberry.
http://c-mobberley.com/wordpress/2013/10/14/raspberry-pi-mongodb-installation-the-working-guide/
http://www.mongodb.com/nosql-explained
http://c-mobberley.com/wordpress/2013/10/14/raspberry-pi-mongodb-installation-the-working-guide/
http://www.mongodb.com/nosql-explained
Sunday, November 2, 2014
Express node first program ran in Raspberry pi
Express is a framework for node.js. It will easy build application using Express. Started to try some applications with Express in Raspberry Pi.
Express is a minimal and flexible Node.js web application framework that provides a robust set of features.http://expressjs.com/
installation - http://expressjs.com/starter/installing.html
examples - http://expressjs.com/guide/error-handling.html

Express is a minimal and flexible Node.js web application framework that provides a robust set of features.http://expressjs.com/
installation - http://expressjs.com/starter/installing.html
examples - http://expressjs.com/guide/error-handling.html
Monday, October 6, 2014
Sunday, September 28, 2014
Monday, August 11, 2014
Not sure how to record the keys of my TV remote with IRRECORD
As per the google search results I tried recording my TV remote keys to create lirc.conf file. Its creating the conf file, but the 'irw' not detecting the keys .
Not sure anything wrong I am doing while recording the keys in the TV remote.
pi@raspberrypi ~ $ irrecord -d /dev/lirc0 ~/lircd.conf
http://www.lirc.org/html/irrecord.html
Not sure anything wrong I am doing while recording the keys in the TV remote.
pi@raspberrypi ~ $ irrecord -d /dev/lirc0 ~/lircd.conf
http://www.lirc.org/html/irrecord.html
Saturday, August 9, 2014
IR transmitter with Raspberry Pi
IR Remote set up with Raspberry Pi
Try to set up IR transamitter with Raspberry Pi!!
IR is one of the low cost communication method we can set up between devices. When started searching for IR transmitter with Raspberry Pi, I came to know that there is a pretty good module LIRC already for IR set up in Raspberry Pi
http://www.lirc.org/
Install LIRC with following command
sudo apt-get install lirc
edit the /etc/modules to add the following lines
lirc_dev
lirc_rpi gpio_in_pin=23 gpio_out_pin=22
Follow the instructions in the link http://tsagi.me/electronics/2013/06/07/universal-raspberry-pi-remote/
To start and stop LIRC
sudo /etc/init.d/lirc stop
sudo /etc/init.d/lirc start


IR Key detection Pulse in Raspberry Pi with LIRC

There are steps where you can map the keys in the remote and make your own IR remote ...... interesting
http://randomtutor.blogspot.in/2013/01/web-based-ir-remote-on-raspberry-pi.html
https://www.cl.cam.ac.uk/projects/raspberrypi/tutorials/robot/cheat_sheet/
http://circuitdesign4u.blogspot.in/2013/02/remote-operated-lighting-system.html
http://tsagi.me/electronics/2013/06/07/universal-raspberry-pi-remote/
Try to set up IR transamitter with Raspberry Pi!!
IR is one of the low cost communication method we can set up between devices. When started searching for IR transmitter with Raspberry Pi, I came to know that there is a pretty good module LIRC already for IR set up in Raspberry Pi
http://www.lirc.org/
Install LIRC with following command
sudo apt-get install lirc
edit the /etc/modules to add the following lines
lirc_dev
lirc_rpi gpio_in_pin=23 gpio_out_pin=22
Follow the instructions in the link http://tsagi.me/electronics/2013/06/07/universal-raspberry-pi-remote/
To start and stop LIRC
sudo /etc/init.d/lirc stop
sudo /etc/init.d/lirc start
Connection diagram and Device Image
It pretty easy to connect the IR to Raspberry Pi, you need to know the VCC and GND both VCC and Raspberry Pi.
IR Key detection Pulse in Raspberry Pi with LIRC
There are steps where you can map the keys in the remote and make your own IR remote ...... interesting
http://randomtutor.blogspot.in/2013/01/web-based-ir-remote-on-raspberry-pi.html
https://www.cl.cam.ac.uk/projects/raspberrypi/tutorials/robot/cheat_sheet/
http://circuitdesign4u.blogspot.in/2013/02/remote-operated-lighting-system.html
http://tsagi.me/electronics/2013/06/07/universal-raspberry-pi-remote/
Thursday, August 7, 2014
i2c connection in Raspberry Pi
What is i2c ?
I²C (Inter-Integrated Circuit), pronounced I-squared-C, is a multi-master, multi-slave, single-ended, serial computer bus invented by Philips Semiconductor, known today as NXP Semiconductors, used for attaching low-speed peripherals to computer motherboards and embedded systems. Alternatively I²C is spelled I2C (pronounced I-two-C) or IIC (pronounced I-I-C).
I heard about i2c , but never experimented something with i2c connections. Now I have an opportunity to do that with Raspberry pi. Its kind of Master -Slave communication or address to address communication.Advantage of this is , with 2 pins ( SDA,SDL) you can control many pins of a device or IC which having i2c provision.
Raspberry Pi have i2c communication provision:

Raspberry i2c set up procedure:
To use the I²C module with the Raspberry Pi, follow the below steps
1.Enable the I²C driver on the Pi by typing sudo vi /etc/modprobe.d/raspi-blacklist.conf
comment the line blacklist i2c-bcm2708 with an #
and save the file
and save the file
2.Edit the modules file with the command sudo vi /etc/modules and add "i2c-dev" to a new line, then save the file
3.Install the i2c-tools package: sudo apt-get install i2c-tools.
4.Install the python 'smbus' module: sudo apt-get install python-smbus.
5.reboot raspberry pi
6.After the reboot, test to see if there is a device connected with the command i2cdetect -y 0
Activate the I²C device with sudo modprobe i2c-dev. This must be done whenever the Pi is restarted.

Reference :
Wednesday, August 6, 2014
Some Low Cost Boards Electronics Guys has to play with

Teensy 3.0 - https://www.pjrc.com/teensy/
Launch Pad - http://www.ti.com/tool/msp-exp430g2
Ardunio - http://www.arduino.cc/
Raspberry pi - http://www.raspberrypi.org/

Tuesday, August 5, 2014
Raspberry Pi - Sh scripts in Python
How to write sh commands in Python
By Importing the library OS in python, we can use the 'sh' scripts in python very easily.
sh script 'a.sh' to echo the 'Hello World'

Python program to use 'a.sh' shell script

Output:

By Importing the library OS in python, we can use the 'sh' scripts in python very easily.
sh script 'a.sh' to echo the 'Hello World'
Python program to use 'a.sh' shell script
Output:
Monday, August 4, 2014
Node Server.js in Raspberry Pi
To serve a page using Node.js require a few lines of code. Raspberry pi browser shows hello world webpage which is running on Node(screenshots below)
Node Server.js program running

Raspberry Pi browser shows the page in localhost port 8888

Server.js Program

Node Server.js program running
Raspberry Pi browser shows the page in localhost port 8888
Server.js Program
node.js Hello World Program
Just thought of writing a program in Node.js. There are a lot of tutorials in Node.js.
I am following the link http://www.nodebeginner.org/#javascript-and-nodejs
HelloWord program
use console.log for printing strings.
console.log("Hello World");


I am following the link http://www.nodebeginner.org/#javascript-and-nodejs
HelloWord program
use console.log for printing strings.
console.log("Hello World");
Node.js on Raspberry Pi
I am not sure much about Node.js. But like to try something with node.js in Raspberry pi. Here is installation steps for Node.js.
Node.js is a cross-platform runtime environment and a library for running applications written in JavaScript outside the browser (for example, on the server).
Node.js applications are designed to maximize throughput and efficiency, using non-blocking I/O and asynchronous events. Node.js applications run single-threaded, although Node.js uses multiple threads for file and network events.Internally, it uses the Google V8 JavaScript engine to execute code, and a large percentage of the basic modules are written in JavaScript.
Node.js was created by Ryan Dahl starting in 2009. Its development and maintenance is sponsored by Joyent.
Installation Steps for Node.js in Raspberry Pi
1. sudo apt-get upgrade
2. sudo apt-get update
Install Node and NPM
wget http://nodejs.org/dist/v0.10.2/node-v0.10.2-linux-arm-pi.tar.gz
tar -xvzf node-v0.10.2-linux-arm-pi.tar.gz
set the path variable as the bin directory
PATH=$PATH:/home/pi/node-v0.10.2-linux-arm-pi/bin
after the setting the path variable , try the command in command line
npm - -version
in order to work on native modules , we need to install node-gyp
check whether gcc is installed or not ?
gcc --version
install Native
npm install -g node-gyp
Sunday, August 3, 2014
X,Y coordinates in Joystick in Pygame
Co-ordinates can be controlled easily with pygame joystick get_axis function.
joystick.get_axis(0) returns the 'x' axis position, at the same time
joystick.get_axis(1) returns the y axis position of the joystick. You can add to you rectangle image coordinates with the above values to make movement to the image in X,Y axis.
# get the rectangle the image occupies
# rec(x, y, w, h)
start_rect = image.get_rect()
image_rect = start_rect
.....
.....
.....
hor_x = joystick.get_axis(0)
hor_y = joystick.get_axis(1)
image_rect.left = image_rect.left+ hor_x * 2
image_rect.top = image_rect.top+ hor_y * 2
Joystick Axis control with Pygame
Raspberry Pi joystick Pygames
As blogged before the screen image position controlling with joystick button are done. The good thing about electronic devices are that there will be many more things to explore further .Joy stick works as coordinates of the axis when we move it. Looks like its values moves from 1.0 to -1.0 . I am interested to control the screen image with this axis rather than buttons in the joystick.
Looking further on the documentation in Pygame - http://www.pygame.org/docs/ref/joystick.html
The axis number must be an integer from zero to get_numaxes()-1.

As blogged before the screen image position controlling with joystick button are done. The good thing about electronic devices are that there will be many more things to explore further .Joy stick works as coordinates of the axis when we move it. Looks like its values moves from 1.0 to -1.0 . I am interested to control the screen image with this axis rather than buttons in the joystick.
Looking further on the documentation in Pygame - http://www.pygame.org/docs/ref/joystick.html
- get_axis()
- get the current position of an axis
- get_axis(axis_number) -> float
The axis number must be an integer from zero to get_numaxes()-1.
Saturday, August 2, 2014
DHT11 connected to Raspberry Pi to measure Room Temperature & Humidity
As always the difficult part while interfacing a device especially sensors is the signal decoding. I always felt difficult to understand the specifications of a electronic device.
DHT11 decoding code and instructions I got from the below link
Raspberry Pi and DHT11 connection Diagram:

I just followed the instructions and finially I measured my room temperature and humidity.


Wednesday, July 30, 2014
Ordered a DHT11 to connect with Raspberry Pi
Today I have ordered DHT11 in ebay.Just need to do some experiment with GPIO pins on Raspberry Pi in input mode.

DHT11 Temperature and Humidity Sensor features a calibrated
digital signal output with the temperature and humidity sensor complex.
Its technology ensures the high reliability and excellent long-term
stability. A high-performance 8-bit microcontroller is connected. This
sensor includes a resistive element and a sense of wet NTC temperature
measuring devices. It has excellent quality, fast response,
anti-interference ability and high cost performance advantages
DHT11 timing diagram:
DHT11 timing diagram:


Waiting for it to come.................................
Tuesday, July 29, 2014
Object Game in Raspberry Pi using Pygame
It is easy to build falling balls in Pygame and try to use the sleep function to delay the balls.

Video in youtube:
Video in youtube:
Monday, July 28, 2014
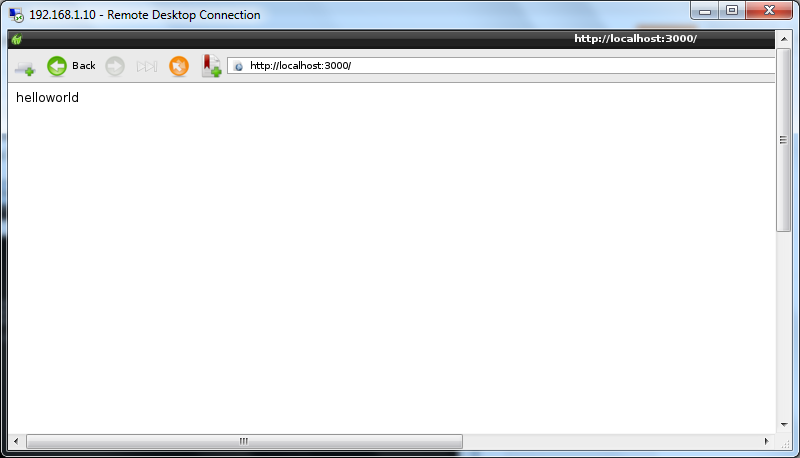
Remote Desktop to Raspberry Pi from Windows 7
How to log in as Remote Desktop to Raspberry Pi from Windows 7 PC
In order to remote log in RaspberryPi , we have to install xrdp. Following steps can be used for install the software .
Install the xrdp software in Raspberry Pi
sudo apt-get install xrdp
in order to know the status of xrdp , we can use the following command
/etc/init.d/xrdp status
For starting , use the below command
/etc/init.d/xrdp start
For stoping , /etc/init.d/xrdp stop
make sure your xrdp running in Raspberry Pi
In windows 7 PC, we will be getting the 'Remote Desktop Connection' from the start menu.
Enter the IP address of your raspberry pi in the computer field, and connect.
Saturday, July 26, 2014
Raspberry Pi connecting with Joystick in Pygame
Programming Joystick gaming with Raspberry pi
Install joystick using the command below:
Install joystick using the command below:
sudo apt-get install joystick
after installation you can find file js0 in the directory:
/dev/input/
sudo cat /dev/input/js0
sudo cat /dev/input/js0 | hexdump
Pygame program to read joystick buttons
joystick = pg.joystick.Joystick(0)
joystick.init()
pg.joystick.joystick(0) returns the joystick object and init() function initialize the device values.
button1 = joystick.get_button(0) retrives the button(0)
below program includes functions to read the keyboard input and mouse inputs.
Pygame Joystick program:
import pygame as pg
# initialize pygame
pg.init()

# use an image you have (.bmp  .jpg  .png  .gif)
image_file = "ball"
# RGB color tuple for screen background
black = (0,0,0)
# screen width and height
sw = 640
sh = 480
# create a screen
screen = pg.display.set_mode((sw, sh))
# give the screen a title
pg.display.set_caption('image follows mouse click position')
# load an image
# convert() unifies the pixel format for faster blit
image = pg.image.load(image_file).convert()
# get the rectangle the image occupies
# rec(x, y, w, h)
start_rect = image.get_rect()
image_rect = start_rect
running = True
joystick = pg.joystick.Joystick(0)
joystick.init()
while running:
    event = pg.event.poll()
    keyinput = pg.key.get_pressed()
    button3 = joystick.get_button(2)
    button1 = joystick.get_button(0)
    # exit on corner 'x' click or escape key press
    if keyinput[pg.K_ESCAPE]:
        raise SystemExit
    elif event.type == pg.QUIT:
        running = False
    elif keyinput[pg.K_LEFT]:
        image_rect.left = image_rect.left - 1
        image_rect.right = image_rect.right-1
        print "corner coordinates --> (%d, %d, %d, %d)" % \
            (image_rect.left, image_rect.top, image_rect.right,
            image_rect.bottom)

        screen.fill(black)

    elif keyinput[pg.K_RIGHT]:
        image_rect.left = image_rect.left + 1
        image_rect.right = image_rect.right+1
        screen.fill(black)
        screen.blit(image, image_rect)
        pg.display.flip()
    elif keyinput[pg.K_DOWN]:
        image_rect.top = image_rect.top + 1
        image_rect.bottom = image_rect.bottom+1
        screen.fill(black)
        screen.blit(image, image_rect)
        pg.display.flip()

    elif keyinput[pg.K_UP]:
        image_rect.top = image_rect.top - 1
        image_rect.bottom = image_rect.bottom-1
        screen.fill(black)
        screen.blit(image, image_rect)
        pg.display.flip()

    elif button3:
        print("Joystick up pressed")
        image_rect.top = image_rect.top - 1
        image_rect.bottom = image_rect.bottom-1
        screen.fill(black)
        screen.blit(image, image_rect)
        pg.display.flip()

    elif button1:
        print("Joystick down pressed")
        image_rect.top = image_rect.top + 1
        image_rect.bottom = image_rect.bottom+1
        screen.fill(black)
        screen.blit(image, image_rect)
        pg.display.flip()
Pygame built with Raspberry Pi & Joystick
Thursday, July 24, 2014
Trying owncloud in Raspberry Pi
I am trying owncloud in Raspberry pi following the instructions . succeeded to lauch owncloud in Raspberry.
install it using following steps


sudo /etc/init.d/php5-fpm restart
sudo /etc/init.d/nginx restart
type in browser : get ip address from ifconfig command
https://192.168.1.10/owncloud

install it using following steps
sudo /etc/init.d/php5-fpm restart
sudo /etc/init.d/nginx restart
type in browser : get ip address from ifconfig command
https://192.168.1.10/owncloud
Monday, July 21, 2014
PyGame in Raspberry using Mouse and Keyboard
I was actually trying to write a simple program which reads the input from keyboard and mouse to Pygame python program. when I searched , found its easy and within a few lines of code in Python we can able to control the movements of an image object in python.
The function image.load can load the image to the screen.
image.get.rect() get the rectangle coordinates of the image position.
Event 'pg.key.get_pressed' reads the key press events and 'ÍF' clause checks which key has been given as inputs in the below program.
The same mouse click event also capturing inside the while loop which runs till the variable 'running' is true.
Based on the key inputs the rectangle image object position coordinates were changed to make movements to the image.
Raspberry Pi Pygame to control Image movements through External Keyboard or mouse


Wednesday, July 16, 2014
Looking for how to build Python program games for Raspberry
I am thinking of Python Program games for Raspberry Pi. Searching google a lot for this nowdays. But looks like a bit of logical thinking required for a building games . But still found PYGAME looks easy to build some simple games http://pygame.org/wiki/tutorials
Pygame is a set of Python modules designed for writing games. Pygame adds
functionality on top of the excellent SDL library. This allows you to create fully featured games and
multimedia programs in the python language. Pygame is highly portable and
runs on nearly every platform and operating system.
Looking to set up a game somehow with my logical skills and that interface with external joystick connected to Raspberry Pi...
Sunday, July 13, 2014
Raspberry Pi + Relay Board to turn on 220v bulb from python Web page
To play with 220V , we should be a little careful and need to take all precautions with testers to check to 220v supply.
This experiment we need to have Raspberry Pi ( already we have) and Relay Board which actually drive the switch and break the ciruit based on the 7th Pin voltage in GPIO pin.
Programs which we are gointo use same the Pyhon program we used to blink the LED from Flask python webpage
Only difference we used the Raspberry Pi GPIO pins 5v(2nd pin),Ground(6th pin), 7th pin to drive the relay a shown in the pictures.


Thursday, July 10, 2014
Raspberry Pi Flask python web page to control the LED
I was searching for how to control the LED from python web page program. I reached in Flask microframework. http://flask.pocoo.org/
Flask is lightweight web application framework written in python and its very much suited for Raspberry Pi board. Controlling the LED connectioned to GPIO pin 7 is easy ,through the python program written importing Flask.
Steps to control LED connected to Raspberry Pi through WebPage
Step1: install Flask in Raspberry Pi.Follow below steps
apt -get install python-pip
pip install Flask
Step2. Connect the LED to the GPIO pin 7 through 470ohm resister
Step3: Writing Programs in Python Flask
First you need to create a python program which actually rendor the html templates stored in the 'templates' directory.
1.Create a folder called 'pythonsites' in your home directory and you can write gpio.py in that folder as below. Refer the Flask site for example programs

route() decorator is used to
bind a function to a URL. refer http://flask.pocoo.org/docs/quickstart/#routing
3 functions we have written which are light_on, light_off & light_blink
We are going to keep 3 links in the html template ,those are Turn On, Turn Off, LED blink
2.Once you have written this program ,should create a folder called 'templates' and keep our html template.
folder path -
pi@raspberrypi ~/naveen/pythonsites/templates $
html page shows in the browser create as light.html

Web page using Flask:
Run gio.py program using python
sudo python gio.py
connect with port to raspberry as follows ,depends on your raspberrypi IP address.
http://192.168.1.10:5000/

Thursday, July 3, 2014
Monday, June 30, 2014
Raspberry Pi LED blink program with Python
Today the experiment with Raspberry Pi was to explore the GPIO. But actually I didn't have anything(even connecting wires) , because its long time since I do something with breadboard. Even I was not sure how much I remember on breadboard schema.
Raspberry Pi GPIO

But within 3 hours of effort ( buying all these connecting wires & resisters & jumpers ), happily now the LED is blinking with Raspberry Pi and Python.
How to Blink LED with Raspberry Pi 7th GPIN using Python Program
1. login to Raspberry ssh ssh pi@192.168.1.10 ( hope you have set a static ip address ) other wise you need to use HDMI cable connect to monitor
2.Write Python program to control GPIN 7
Program to On the 7th PIN :
import RPi.GPIO as GPIO
GPIO.setmode(GPIO.BOARD)
GPIO.setup(7,GPIO.OUT)
GPIO.output(7,True)
GPIO.setmode(GPIO.BOARD)
GPIO.setup(7,GPIO.OUT)
GPIO.output(7,True)
Program to Blink LED connected to the 7th Pin
if you don't have Rpi GPIO module , it is required to get and install using apt-get install command. Those libraries should be imported before we use specific opcodes. As you indentation is important in python especially for loop logic.
import RPi.GPIO as GPIO
import time
GPIO.setmode(GPIO.BOARD)
GPIO.setup(7,GPIO.OUT)
while(1) :
GPIO.output(7,True)
time.sleep(1)
GPIO.output(7,False)
time.sleep(1)
import time
GPIO.setmode(GPIO.BOARD)
GPIO.setup(7,GPIO.OUT)
while(1) :
GPIO.output(7,True)
time.sleep(1)
GPIO.output(7,False)
time.sleep(1)
Setting Up Raspberry Pi board and Circuit to LED.
before starting it recommended to test the LED with connecting the 3.3 V GPIO pin(1) and GPIO Ground pin(6) through 270ohm to see its up or not . Once its tested , you can move the 3.3V connecting jumper wire to Pin7 in Raspberry so that the python program can control the Pin 7 and make the value 0 and 1 to blink the LED.

Saturday, June 28, 2014
How to host web pages in Raspberry Pi
Web Hosting in Raspberry Pi
Its easy to host web pages in your running Raspberry Pi.
1. Install Apache2
use the following link for the details - http://www.raspberrypi.org/documentation/remote-access/web-server/apache.md
sudo apt-get install apache2 -y
2.Once you install start the apache server
follow link - http://httpd.apache.org/docs/2.2/stopping.html
3. once you type your raspberrypi ip address in address bar in your computer , it will load the default of Apache. you can test apache installation that way.
In order to change default apache root directory ,edit file 'default' file in the directory below
/etc/apache2/sites-avaiable
edit the following and save the file.
DocumentRoot 'your project library'
You can browse the Raspberry project folder html, by giving pi ipaddress/first.html from your computer.


Friday, June 27, 2014
Raspberry Pi connecting with Laptop and Android phone
Connect raspberry pi with your laptop.
1. Raspberry pi should be up and running
2. Connect LAN Cable to the router
3. Set up a static IP address to the Pi.
https://www.modmypi.com/blog/tutorial-how-to-give-your-raspberry-pi-a-static-ip-address
4. Install Putty software in your laptop. For Ubuntu linux machines use Synaptic Package manager for download and install Puttysoftware.

Android - connection with Raspberry Pi
1.Install VNCSERVER on your Pi
http://raspi.tv/2012/install-and-use-tightvnc-remote-desktop-on-raspberry-pi-through-windows-android-or-ios
3. In Raspberry Pi board run vncserver command
4. Configure AndroidVNC in phone with following and connect
NickName:Pi
address: static ip address of Raspberry Pi
Port: 5901

1. Raspberry pi should be up and running
2. Connect LAN Cable to the router
3. Set up a static IP address to the Pi.
https://www.modmypi.com/blog/tutorial-how-to-give-your-raspberry-pi-a-static-ip-address
4. Install Putty software in your laptop. For Ubuntu linux machines use Synaptic Package manager for download and install Puttysoftware.
Android - connection with Raspberry Pi
1.Install VNCSERVER on your Pi
sudo apt-get updatesudo apt-get install tightvncserver2. Install androidvnc in your android phonehttp://raspi.tv/2012/install-and-use-tightvnc-remote-desktop-on-raspberry-pi-through-windows-android-or-ios
3. In Raspberry Pi board run vncserver command
4. Configure AndroidVNC in phone with following and connect
NickName:Pi
address: static ip address of Raspberry Pi
Port: 5901